Garlic
BackGarlic (Allium sativum) has been grown for thousands of years for its strong flavour and is a staple ingredient in just about every cuisine nowadays. Not only does it add great flavour to dishes it’s well known for medicinal properties as it is packed with antioxidants and lots of vitamins. In the past it was the wonder cure for everything from pimples to the plague!
Technically garlic is a perennial bulb but is mainly treated as an annual with fresh plantings each year. Planted amongst veggies and under fruit trees the smell may help keep sucking insects at bay as well as warding off any vampires that are lurking around!
Note that a lot of garlic available in our supermarkets is grown overseas and is treated with a number of nasty chemicals. It’s a very good reason to grow your own.
Sowing Guide for Garlic
| Growing Zone | Sowing Time |
| Cool Zones | Autumn, Spring |
| Mediterranean Zones | Autumn, Winter |
| Warm & Temperate Frost Free Zones | Autumn, Winter |
| Tropical & Subtropical Zones | Autumn, Winter |
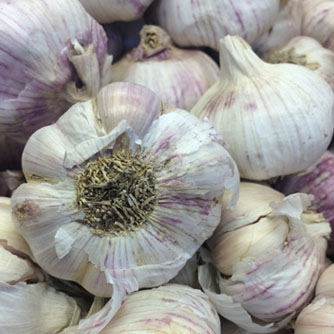
Australian grown garlic bulbs
The traditional time to plant garlic is in autumn when the summer heat has dissipated and soils are cooling down. In very cold areas the plant particularly needs time to establish before snow and harsh frosts appear. If you miss that window you’ll need to wait until early spring to plant but with less growing time you’ll get smaller bulbs. In milder areas winter plantings can be done but again the bulbs will usually be smaller.
How To Grow Garlic
Firstly select a sunny position with good drainage. Mix plenty of manure, compost and organic pelletised fertiliser into your soil so that it’s nice and rich. Garlic does grow in poorer soils but will perform best if you improve it first. Garlic also likes a neutral pH so if yours is acidic adjust by adding some lime or dolomite. We don’t recommend growing in heavy clay soils but if that’s all you’ve got then add gypsum to help improve the drainage.
Take your garlic bulb and gently break it in separate cloves. There’s no need to remove any papery covering around individual cloves. Usually the larger the clove the larger the bulb it will grow into so don’t bother planting any of the tiny cloves found in the centre of the bulb.
It’s best to soak cloves overnight in a solution of OCP eco-seaweed. This will speed up the development of roots and reduce the risk of the clove rotting. Plant each clove pointy end up and water in with OCP eco-seaweed for good measure.
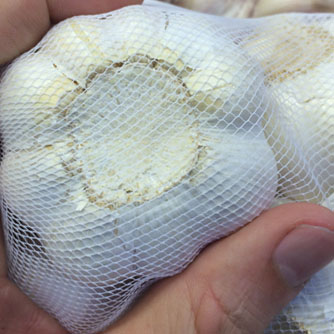
Garlic from overseas is treated with chemicals and has the roots cut out so it won't grow
Mulch the bed to prevent competition from weeds and to help regulate moisture levels. Periods of dryness will slow bulb development so be sure to water well throughout the growing season but always keep an eye on the drainage. Garlic with wet feet can rot especially during cold weather.
Every 2-3 weeks apply a mix of OCP eco-seaweed and OCP eco-aminogro. This will keep your garlic growing strong and give you big bulbs at harvest time.
Some garlic (hardneck varieties) will produce a flower stalk called a scape and some won’t (softneck varieties). Some people advocate removing the scape to ensure all energy goes into bulb growth while others feel it doesn’t make much difference. If left on the flower heads will often produce small bulbils that can be eaten or used to grow more plants next year. If you do remove the scapes the good news is they are edible so take them into the kitchen instead of the compost bin.
If you plan to grow garlic every year it is important to rotate plantings to different areas of the garden to prevent/minimise disease and pest problems.
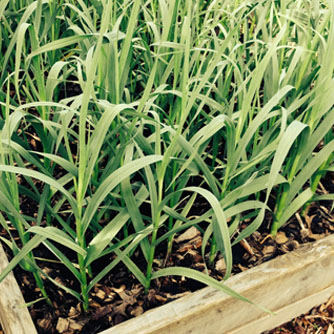
Bed of garlic plants
Types of Garlic
There are many different types of garlic around but most need to grow through a period of lengthening daylight hours in order to form bulbs (ie from winter to spring/summer). Luckily for people living in northern regions (where day length doesn’t vary as much compared to southern Australia) there are some cultivars that are not are as sensitive to day length. There are also varieties which perform better in cold conditions, some which store longer, have differing flavour or colour and of course there are the softnecks and hardnecks!
While it’s easy to feel confused the best thing is to simply choose a few varieties which suit your needs and growing conditions and then see how they go. In the next year replant the best performers.
You should source garlic from nurseries or mail order companies. Using garlic bought from the supermarket is not recommended as it is almost always treated with chemicals to prevent early sprouting when in the store. This will continue to impact growth when you stick them in the soil.
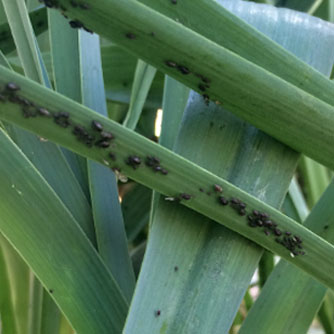
Watch out for black aphids clustering on garlic foliage
Here are some of the best known garlic cultivars to get you started:
‘Australian White’ – a large white variety with slight purple streaks that is good for growing in cool zones like southern NSW and Victoria.
‘Glenlarge’ – a purple variety that is not so day sensitive. Perfect for warmer climates and Australian conditions.
‘Italian White’ – this is a large white variety with many bulbs that does not usually produce flowers. Strong flavoured and known to store well.
‘Monaro Purple’ – is a medium size bulb with an attractive striped purple skin. Suitable for cooler zones.
Please note that large bulbs sold as elephant or Russian garlic are not actually garlic but another plant in the onion family. It has a weaker garlic flavour.
Harvesting and Storage of Garlic
When plants are getting close to harvest time they will start to look a bit sad with the outer, lower leaves yellowing and drying out (central leaves will still be green though). The timing of this depends on your climate and when you planted. Usually it’s about 8-9 months from planting or soon after flowering (if it’s a flowering variety and you didn’t cut it off). When this happens stop watering and fertilising to allow the bulbs to harden off before harvesting. Given the huge diversity of growing climates in Australia harvesting can occur anytime from September through to late summer.
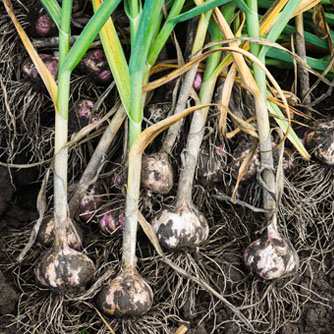
Gently brush dirt of freshly dug garlic and hang to cure for a few weeks
Use a fork to ease the bulbs out of the soil and brush off any excess dirt. Be gentle as the bulbs are easily bruised. Keep the leaves on and hang them in bunches of 10 in a dry shady spot with good airflow for 2-3 weeks. During this time the leaves will dry out and the protective papery skin develop around the bulb. Watch for any mould appearing on leaves or bulbs and remove this straight away. Once fully dried, or cured, trim the leaves about 2-3cm from the bulb and tidy up the roots as well. Keep some of the fattest bulbs aside for replanting while the rest can head to the kitchen!
If you want to try your hand at plaiting your garlic this can be done either when freshly harvested or after you’ve cured the bulbs and the stems have dried out. Be patient as it can be harder than it looks to master this skill.
Pest and Diseases of Garlic (and other problems)
Garlic grown in good conditions will usually be trouble free. However here are some things which can go wrong:
- Aphids - the most common thing to attack garlic is the dark grey onion aphid. Spray with an organic insecticide to protect plants.
- Thrips – another sap sucking pest which causes white speckling on leaves and shrivelling up of plants when severe. Overseas OCP eco-neem is approved for thrips but not in Australia. Soapy sprays may be effective but thrips will often congregate deep in the folds of the plant making repeat sprays necessary.
- Nematodes – these can infest the roots, bulb and stem causing them to go soft. OCP eco-nemguard will control nematodes living freely in the soil (before they get into the garlic). Practicing crop rotation and digging in a green manure crop can also help to reduce nematode numbers.
- Fungal problems – there are various fungal diseases like rust and downy mildew which can attack plants. Remove infected foliage or entire plants and try spraying with an organic fungicide. The best approach however is prevention. Plant cloves so that there is sufficient space between plants for good air flow and avoid foliage when watering. Keep plants in peak health with regular doses of OCP eco-seaweed and OCP eco-aminogro.
- Other fungal problems – there are various diseases which attack the roots and bulb leading to stunted growth, rotting and often plant death. These can be difficult or impossible to control so prevention is the best approach. Only plant quality bulbs which are disease free and practice crop rotation. Ensure your plants are not over watered and that the soil drains well.
- Viruses – there are several damaging viruses which attack garlic and cause yellow markings on leaves, stunted growth and reduced bulb size. Once your plant is infected you can’t get rid of the virus so plants should be destroyed. Only buy virus free bulbs and control sap suckers (like aphids and thrips) which can spread them.
- Small bulbs at harvest – if the plant started off as a small clove or was planted late then the end bulb may be quite small. Likewise if the plant wasn’t fed or watered enough the bulb can be small.
- Producing a single bulb – if you dig up your garlic and it seems to have only grown an onion then what you have is a ’round’. This is when the plant has just produced a single swollen bulb, like an onion, instead of a cluster of cloves. Usually caused by the same thing as small bulbs (see above) but it can also be a lack of cooler temperatures during winter. Rounds are still edible.
- Split bulbs – if you harvest too late then the bulbs can swell and split apart. Once the protective papery skins have split the bulbs won’t store as well so eat these bulbs first.
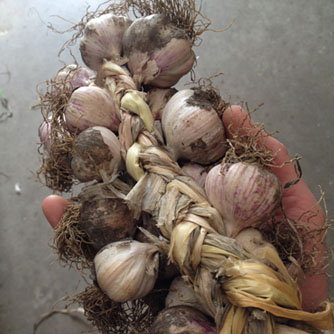
Home plaited garlic ready to have the roots trimmed off