Waratahs
BackWaratahs are simply one of the most spectacular of all our native plants. While there are several waratah species the best known is the NSW state flower (Telopea speciosissima) with it’s large red flowers and serrated green leaves. In addition to the species waratahs there are an increasing number of varieties available including:
- dwarf varieties suitable for pots
- varieties tolerant of shadier and cooler conditions eg ‘Shady Lady’ series
- waratahs with different flower colours eg ‘Champagne’ (pink), ‘Golden Globe’ (yellow) and ‘Bridal Gown’ (white)
- waratahs that cope with warmer humid conditions eg ‘Essies Gift’
Whichever type you plant you’ll be rewarded with beautiful flowers, mainly in spring, that are full of nectar and are excellent for bringing birds into your garden. An added bonus with waratahs is they also make fantastic cut flowers.
How To Grow Waratahs
Find a spot in the garden that receives morning sun and afternoon shade and is protected from winds. Flowers can be bleached by strong afternoon sun so that protection is important. It’s also important that the soil drains freely as waratahs are prone to fungal root diseases. A sandy-loam soil that has some leaf mulch mixed in is perfect. Waratahs can grow in clay soils but the drainage must be excellent or the plant performance and longevity will be poor. If you’re feeling lucky and want to grow one in clay then apply some gypsum to help improve drainage.
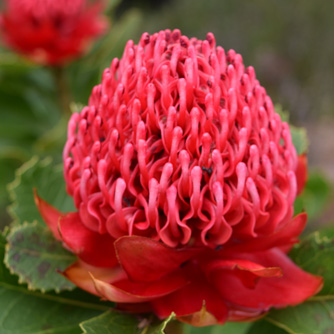
Fully opened waratah flower
If growing in pots make sure you use a native potting mix and ensure excess water can drain away easily. Take away any saucers to avoid water pooling.
Waratahs prefer quite acidic soils (pH 5-6) so it’s best to test your soil and adjust as necessary. Use lime or dolomite to raise the pH. Use sulphur to reduce it.
When selecting a plant from the nursery choose a younger vigorous looking plant that is not root bound (gently tap it out of the pot to check that the roots aren’t circling around the edges). Dig over an area of soil that is roughly three times the size of the pot, working in some leaf mulch as you go and then plant the waratah. If you’re worried about your soil’s drainage properties then mound up the soil when planting so the waratah sits a little higher and this will assist with drainage.
Water the plant with OCP eco-seaweed to help settle it in and reduce transplant shock. Then apply a leaf mulch as this will help to retain moisture and keep weeds at bay. Water regularly so that the roots don’t dry out until the plant becomes fully established.
If you’re up for some fun try growing waratahs from seed. If the seed is fresh (less than 6 months old) then you can expect good germination rates but rates drop dramatically with older seed unless it has been kept refrigerated. Sow seed into punnets, lightly cover them and then keep moist. Seedlings will emerge in 2-6 weeks. They are vulnerable to drying out but at the same time if kept too wet they can die off rapidly due to root fungal diseases. So it’s a bit of a balancing act which requires you to watch your seedlings closely. Weekly doses of eco-seaweed can help strengthen the seedlings against these stresses. Seedlings will typically take 5 years to reach flowering size.
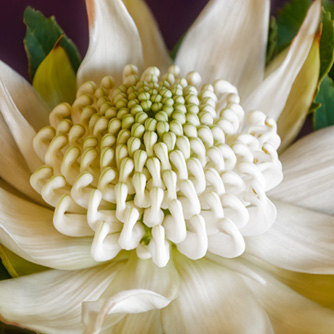
Unusual white flowering waratah
Fertilising and Maintenance of Waratahs
While many waratahs come from regions which have low nutrient soils they will definitely perform better in your garden if fertilised. New plants will benefit from doses of OCP eco-seaweed and OCP eco-aminogro every 2-3 weeks to strengthen plants and boost growth. Established plants can be fed in spring, summer (after flowering finishes) and autumn with a handful of organic pelleted fertiliser, some compost or a light layer of aged manures.
If you’re worried about phosphorus sensitivity (one of the main nutrients found in fertilisers) then this is where it gets complicated. Some people experience rapid waratah death after applying a standard fertiliser (which has higher phosphorus levels) while others see their plants thrive as a result. Current research suspects it depends on how the waratah is initially grown. If the nursery used regular fertiliser (with high phosphorus) during production then the plant will have adapted to this and grow well. If however the nursery used a native fertiliser (low in phosphorus) and you immediately switch to a regular fertiliser once in your garden then the waratah can die due to phosphorus overdose.
The good news is that plants can adjust over time but to avoid problems use an organic fertiliser lightly in the first year and then increase to normal rates. If you’re still worried then use a “native fertiliser” from the beginning but keep in mind these products are rarely organic. Avoid any fertiliser which is high in nitrogen (often the case with artificial fertilisers) as this can increase the risk of fungal problems in waratahs.
Waratahs should be pruned to maintain a good dense shape and encourage better flower production. Cutting flowers for a vase helps keep the plant in shape but we recommend going harder for the best results. Once flowering has finished prune back the plant all over by a third and then fertilise. Sounds severe but this will keep plants invigorated and result in more flowers the following season. Prune off any weak, spindly stems as you see them. Top up mulch as required.
Waratahs can also be propagated by cuttings and this is best done in spring or early summer when plants are actively growing. Use the prunings taken after flowering to prepare cuttings 15-20cm long and that have several sets of leaves. Plant into an extremely free draining mix and keep them lightly moist until roots form (4-6 weeks later). Cuttings are susceptible to fungal attack so expect losses unless you’ve achieved very sterile growing conditions. Use OCP eco-seaweed to encourage root development and help improve your strike rate.
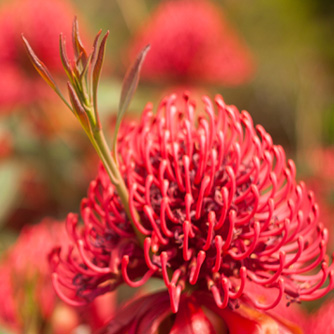
Growth shoots through waratah flower
Pest and Disease Problems of Waratahs
Here are some common problems:
- Root rot – this fungal disease is the most common cause of rapid plant death. Poor soil drainage is going to be at the heart of the problem as waratahs are not happy with wet feet as it makes them more susceptible to fungal attack. If you can’t improve your soil drainage then consider growing your waratahs in pots.
- Yellowing foliage – most likely cause by either scale damage (see below) or a deficiency induced by incorrect soil pH. Test your soil pH and make the necessary corrections to get it to 5-6. Remember lime or dolomite will increase the pH and sulphur will reduce it. It can take time to correct soil pH so help your waratah out with weekly doses of OCP eco-aminogro over the foliage and soil.
- Scale – If you have mottled yellow marks on the leaves this is often caused by scale sucking sap from the underside. Turn over the leaves and check for the scale. Other scale may not cause leaf discolouration but are still noticeable as small spots or bumps which can be wiped off with your fingers. Spray with plants thoroughly with a horticultural oil spray.
- Caterpillars – there are a few different caterpillars which can attack the foliage, buds and stems. Pick these off when spotted and spray with OCP eco-neem.
- Browning of flowers – the outer ‘petals’ known as bracts commonly brown on the tips and can spoil the look of the flower. This is most noticeable with lighter coloured waratahs but can still occur with the reds as well. A lack of water as buds open is thought to increase this problem so be sure to water your plants sufficiently. Hot sunlight and winds are other causes which is why waratahs should be planted in protected locations. And finally a lack of nutrition seems to also exacerbate the problem so don’t forget to check the soil pH and feed your plant.
- Shoots in the flower – sometimes green shoots will develop and poke through the flower heads before they’ve finished. Usually this is due to fertilising at the wrong time. If fed when in flowering mode waratahs will sometimes use that nutrient to push out new growth so it’s best to give their summer feed after flowering has finished and you’ve pruned.